Showing posts with label tile. Show all posts

Sunday, March 30, 2014

Powder Room Progress

When I last posted about the powder room back in November we were in the process of finalizing our plan for the renovation and finishing the demo work.  Despite my delay posting all of these updates Andy continued to work diligently on the renovation through December.

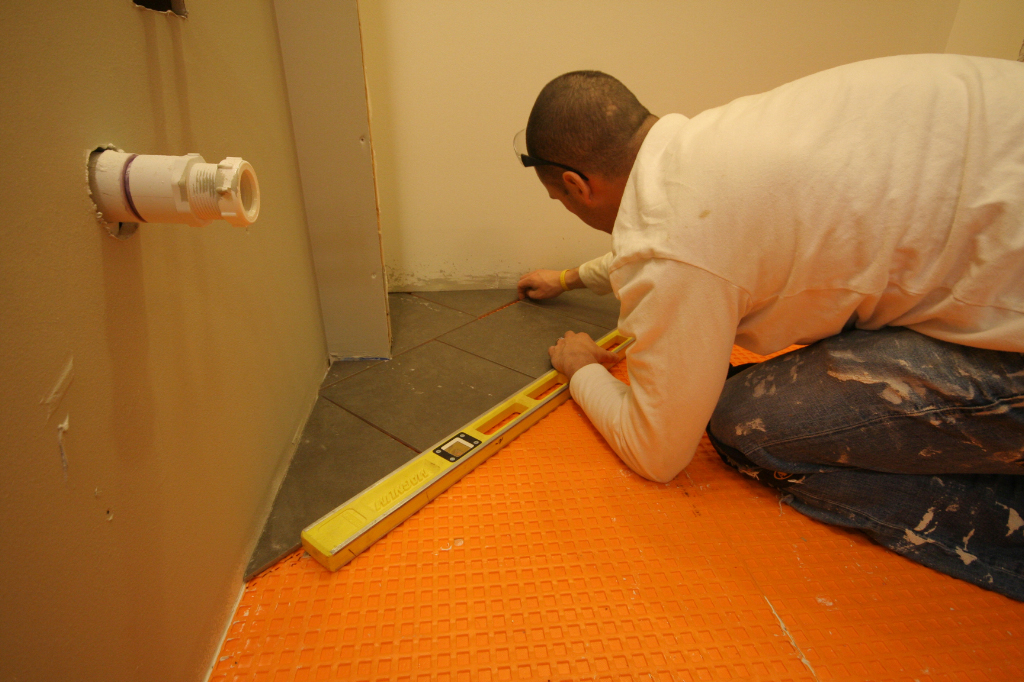
Andy wasn't a huge fan of the Ditra mat the first time we used it in the upstairs bathroom. It's a lightweight alternative to cement board and it's supposed to be much easier to work with.  We had enough leftover from the master bathroom renovation that Andy decided to try it again.  This time he has great success  -- so much so that was actually just bought more it for the upstairs hall bathroom.

We decided on a simple thin metal transition between the new tile and old vinyl in the kitchen since we don't know what that floor will be in the future.

You really should work out of the room as you tile but Andy wanted to make sure that the pieces at the transition were perfect so he worked from inside and I handed him the tiles he already had cut.


It was a multi-day process since he had to wait for the first round of tiles to set before he could finish the area under the toilet.

He also managed to paint the walls and grout the new tile (all while I was probably asleep on the couch).


The final portion of the renovation didn't happen until this January so that will be a separate post but it was nice just to have a toilet on the first floor again!

Sunday, June 17, 2012

Fully Functional

I'm behind on my blog updates.  Hopefully I'll get up-to-speed this week.  

Two weeks ago we had a full weekend at home and were able to get the new master bathroom fully functional.  Andy prepared the tub and tile for caulk.


We picked a slightly darker grout so we didn't want white or almond caulk because it would have been too light.  Andy put the silicone caulk in a ziploc bag.

Added some dry grout and mixed until it matched the grout.

Then he cut off the tip of the bag an applied the caulk.

Almost ready.  Once the caulk was dry I was able to scrub the tub and tile to get it ready to be sealed.

Nice match!

Then I applied three coats of grout sealer.  It had to dry for 24 hours but was ready the next evening for Andy's first shower in the new bathroom.

Sunday, April 22, 2012

The Most Time Intensive and the Most Rewarding

This is a long post (consider yourself warned!).  Browsing the pictures will give all of the info you need if you don't want to bother with the words. Let's start with the best part (it's like eating dessert before dinner!!)

What's that?  Some mosaic tile?

In a niche?

And there are three of them?
  
In this wonderful, new shower? (PS -- I think I might sleep in the tub tonight considering it's now my favorite part of the house)

Let's go back to the beginning.  
We borrowed a tile saw from Kyle Wise becuase this project required some very detailed cuts and the pencil tiles had to be mitered around the edges of the niches.  This thing is a beast!


Andy installed temporary boards around the tub, just below the first full tile so that we had a level edge to install the tiles along.

We taped up the first row to make sure everything lined up the way we wanted it to.

There were a lot of cuts...

Andy had to install the tile around the edges of the niches before he finished the tile on the back wall.


Installing the mosaic tile and pencil tile was tedious and at times uncomfortable...

All of the tiles in place and waiting for grout.


All grouted!  We just need to seal the grout and then it will be ready to go!


Friday, March 16, 2012

Filling In the Cracks

We probably could have grouted the tile one night after work, but after our marathon tiling session we needed a break.  We waited until this past weekend to install the grout.

Andy took this job on himself.  It's a small space and it was easier for just one person to grout the floor tiles.


We love the results!!  Now we have to tile the tub surround.


Monday, March 12, 2012

Floor Tile

Last weekend we spent all day Saturday (12 hours!) installing the floor tile in the master bathroom.  We have 12x12" tile and used a brick pattern on a diagonal.  We knew that this pattern would make more cuts and take longer to install, but we heard from several people that straight lines in a long, narrow space, can really highlight imperfections.  Originally I wanted the diagonals to run the other direction (If you're a Manning or related to one, you can appreciate that tile, like fish in a wall sculpture, can go the "right way" or the "wrong way")  Basically, our tiles are "swimming" the wrong direction, but there was absolutely no way to install them in that direction without tiling yourself into a corner.  Andy would have had to live in the bathroom (minus the toilet) for 24 hours until the thinset dried!

We dry laid the first few rows to practice some of the cuts and work in the closet before we mixed the thinset and had to start laying the tile.


Andy borrowed a tile saw from a co-worker (thanks to JM!) and we set it up over the bathtub so that we didn't have to truck up and down the steps and out to the garage to make all of the cuts.

The "affectionately" named dinosaur tile!

It took us a few tries to get a system down, but by this point we had it down to a science.  We would measure and make all of the necessary cuts, Andy applied the thinset, and then I laid the tiles.

It actually took two days to do all of the tile 1)because we were too tired to finish it Saturday night, and 2) it was easier to work in the small space since we could walk on the tile we installed on Saturday.

All done and ready for grout!


Friday, March 9, 2012

Master Bathroom Updates

I am way behind on my blogging.  Apparently we are doing work around the house faster than I can write about it.  I'm an engineer because I like numbers a lot more than words and the writing part of this whole blog thing is not my favorite, but we really do love being able to look back through the blog and see what we have accomplished.  Bear with me while I try to play catch-up...

Andy was home from work a day last week and he painted the walls in the bathroom.  We picked a light grayish-greenish-taupey kind of color.  I think I need to learn how to use white balance with the camera because these pictures really don't show the true color.  On my computer these pictures make the walls look a bit sea-foamy green, but it's not all accurate.  

Neither of us are good at cutting in by hand, so it's worth it to us to take the time to tape the ceiling.

After two coats of paint Andy was able to cut the underlayment for the new tile.  We chose a product called Ditra mat in place of cement backer board.  It's lighter and supposed to be easier to install, but it is more expensive.  After using backer board in the tub surround we thought this product could be worthwhile.  The tile has been down since last weekend and while we are not unhappy with the Ditra mat, we're not sure it's worth the extra money.


After laying it all out Andy was able to attach it to the subfloor with a thin layer of thinset.


We taped a temporary plastic border to protect the newly painted walls (this picture is probably the best representation of the wall color).  It's officially ready for floor tile!